


Update: New Version, beta-0.7 is up for download. Enjoy! It fixes all the known bugs. For WiFi, make sure you install it over the Samsung firmware that works good for you, preferably I9505VJUGNE2. Do find the bug tracker and changelog at the very end of this post to stay updated with development. As also the what’s next section!
Thanks to our friend who made this ROM and wishes to remain anonymous, we bring to you a preview of new and upcoming custom ROM for the Galaxy S4 I9505 called ‘Lots Of L’. As the name suggests, it’s themed to look like Android L but is based on KitKat (4.4.2 to be exact).
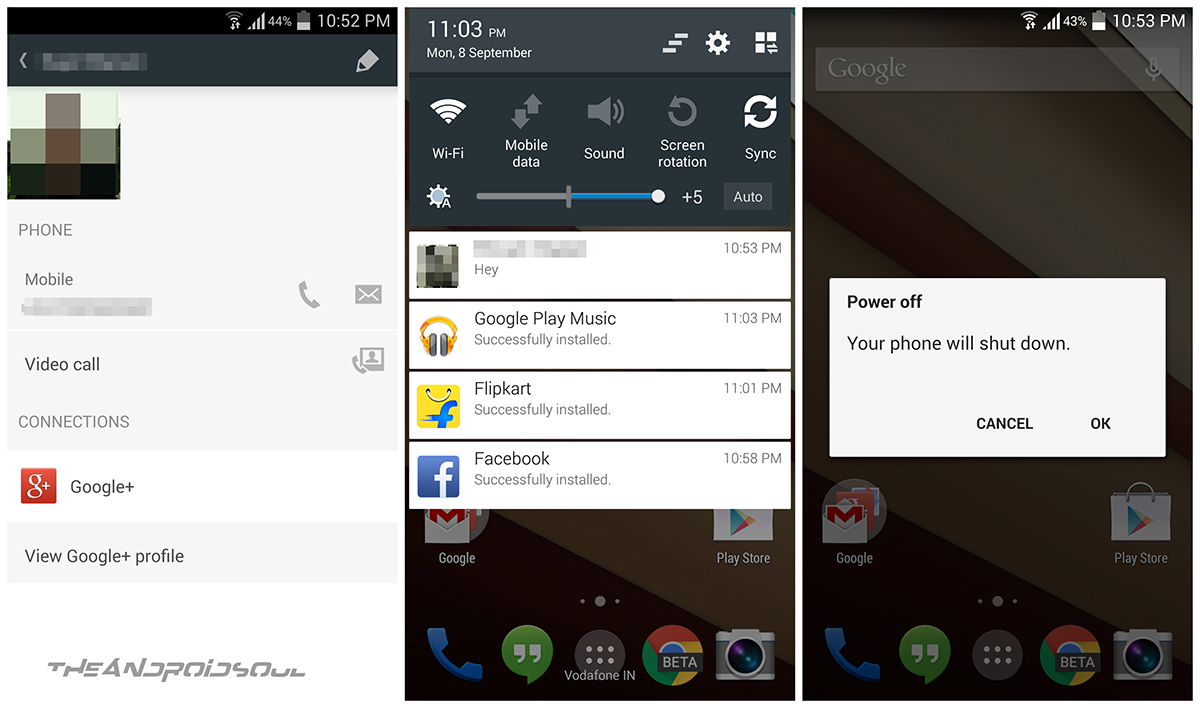
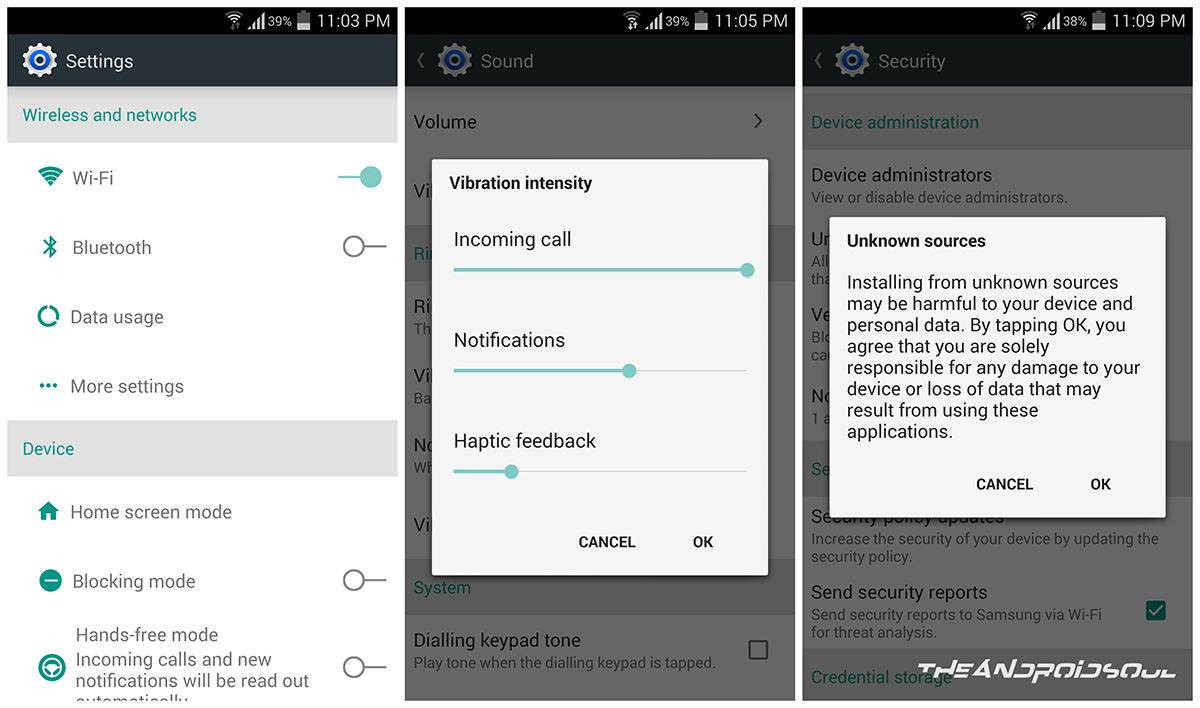
The Lots Of L tries to get you feel of Android L on your Galaxy S4 I9505 and it fairly succeeds with that, too. Check out the screenshots below of the of the Lots Of L ROM for Galaxy S4 to get to know more about it.
This ROM is not on XDA forums yet, as our friend would be sharing it over there once it’s more polished, maybe a release candidate (it’s in beta right now).
About the ROM
Welcome people to the beta edition of the ‘Lots OF L’ custom ROM for Galaxy S4, with Android L looks, while on 4.4.
This is a beta release, but everything works great. Considering it’s more or less a theme only (cool mods are yet to arrive, but promised). so features-wise, everything is clicking.
And it’s pre-rooted, too, in case you were wondering. But still has KNOX pre-installed, though, you can remove it using the pre-installed SuperSU app.
What you get right now is this firmware, I9505VJUGNE2, pre-rooted, and with Android L theme.
A note from its developer, Keshav:I really plan to add many cool features to make it more like Android L but you only got to wait for that for now. Moreover, as I am new to all of this, the features addition is not going to be in nightly updates obviously but I do hope I’m able to add good no. of features by each weekend.That’s it. Let me know what you feel about it. It really matters.
Features:
- Base firmware: I9505VJUGNE2
- Pre-rooted
- Android L theme (pls feedback on this!)
- Everything else to come in future updates of this ‘Lots Of L’ ROM
Our own direct download link is below, with the installation guide. Try the ROM and let us know what you think of it.
More Screenshots

GALAXY S4 ANDROID L THEMED ROM ‘LOTS OF L’
| Firmware Version | I9505VJUGNE2 |
| Android Version | Android 4.4.2, KitKat |
| Is this Official? | No. But it’s based on official KitKat firmware by Samsung. |
| Release Date | September 29, 2014 (beta version) |
| Credits | Keshav |
WARNING!
Warranty may be void of your device if you follow the procedures given on this page.
You only are responsible for your device. We won’t be liable if any damage occurs to your device and/or its components.
GALAXY S4 LTE GT-I9505 ANDROID L THEMED ROM, ‘LOTS OF L’
Before you begin with guide instructions below, make sure your android device is adequately charged — at least 50% battery of the device.
STEP 0: CHECK DEVICE MODEL NO.
To make sure your device is eligible with this, you must first confirm its model no. in ‘About device’ option under Settings. Another way to confirm model no. is by looking for it on the packaging box of your device. It must be GT-I9505!
Do not use the procedures discussed here on any other variants of Galaxy S4 LTE or any other device of Samsung or any other company. You have been warned!
STEP 1: BACKUP YOUR DEVICE
Back up important data and stuff before you start playing around here as there are chances you might lose your apps and app-data (app settings, game progress, etc.), and in rare case, files on the internal memory, too.
For help on Backup and Restore, check out our exclusive page on that linked right below.
STEP 2: INSTALL LATEST DRIVER
You must have proper and working driver installed on your windows computer to be able to successfully flash stock firmware on your Galaxy S4 LTE I9505.
In case you’re not sure, follow the link below for a definitive guide for installing driver for your Galaxy S4 on your computer.
STEP 3: INSTALL A SAMSUNG FIRMWARE (Important!)
You need a Samsung firmware as base, preferably I9505VJUGNE2. Make sure that WiFi is working already, then install the ROM.
STEP 4: INSTALL A CUSTOM RECOVERY (TWRP or CWM)
You need either of the cwm or twrp recovery installed on your Galaxy S4, using which you can flash the Lots Of L custom ROM.
If you need help with this, check out the guide below which contains recovery’s download link with installation instructions. Between the two below, we prefer TWRP recovery.
STEP 5: INSTALLATION INSTRUCTIONS
DOWNLOADS
Okay guys, v0.7 (beta) is now available, and it fixes all the bugs you’ve got so far. MAKE SURE you have installed Samsung base firmware, I9505VJUGNE2, before installing the ROM.
Download the rom file provided below, and then transfer it to phone’s internal or external sdcard so that you are able to flash the rom using cwm or twrp recovery.
Downloads Required
Download the four parts of the ROM from the zip files below:
Single Download Link: DOWNLOAD LINK | Filename: lol-rom-beta-0.7.zip | Size: 1.61 GB
Note: Extractthe four parts of the ROM file from the download links provided above using 7 Zip. This will help in rebuilding the actual ROM file, lol_rom_beta_v0.5.zip, which can be flashed in recovery.
CWM Recovery 6.0.4.6 (Philz touch) (install via Odin v3.0.9)
NOTE:
Please don’t hotlink or mirror the above links. Instead, please link this page so that people can come here and get the updated direct download links for newer versions.
Also, our friend, the maker of this ROM would be releasing the ROM soon on XDA, once it’s more polished. Meanwhile you can discuss it over there for sure, no harms with that.
GUIDE: HOW TO INSTALL ANDROID L THEME ON GALAXY S4 WITH LOTS OF L CUSTOM ROM
Be sure to transfer the ROM file, lol-rom-beta-0.7.zip, to your phone and remember the location of the file.
You will need to flash them now on your device using either of ClockworkMod (CWM) or TWRP recovery.
We’ve got separate guide for CWM and TWRP recovery, so use the guide relevant to the recovery you have installed on your device.
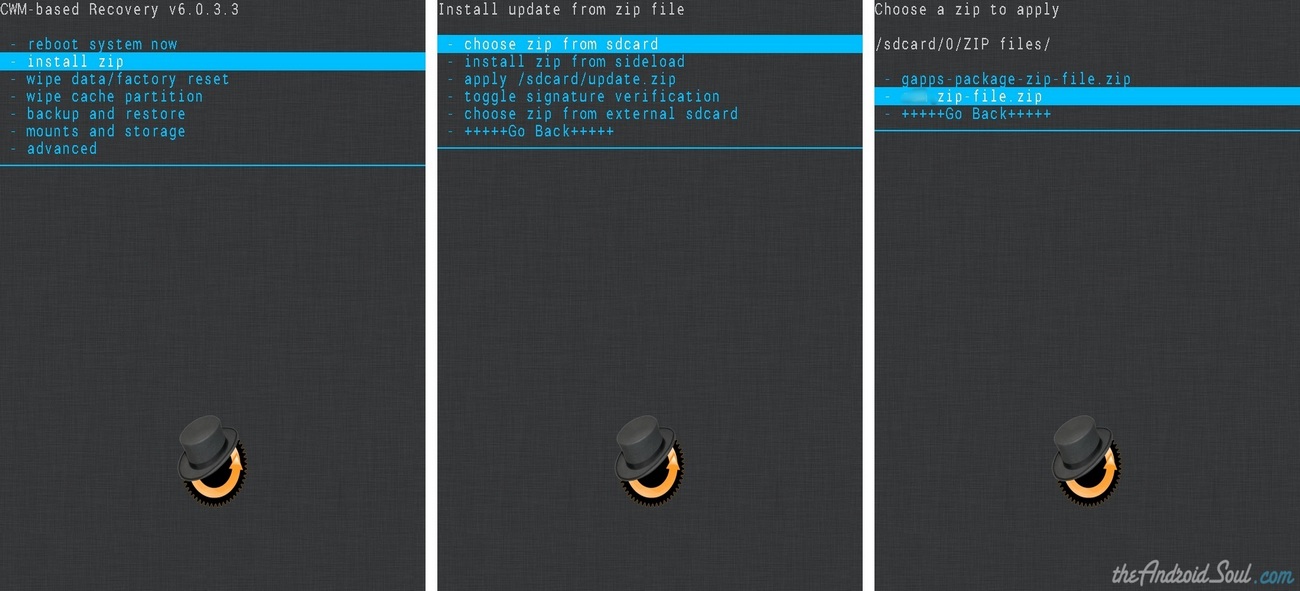
GUIDE FOR CWM RECOVERY USERS
Example video: If you haven’t used CWM recovery before to install a .zip file of a ROM or anything else, then we suggest you first watch a video of that to get familiar with the process. Click here to watch the video
- Boot into recovery mode. If you’re rooted, the easiest way to boot into recovery mode would be using the QuickBoot app. Or simple use the method given below to boot into Download Mode:
- Power off your phone first and wait for 6-7 seconds after display is off.
- Press and hold these 3 buttons together until you see recovery’s screen: Volume Up + Power + Home.
- Create a Nandroid Backup from recovery. It’s optional but very important to do, so that in case something goes wrong you can restore to current status easily. For making a Nandroid Backup, go to Backup And Restore » Backup.
- Perform a clean-up of the device (This will delete all apps and their settings and game progress). For this:
- Select Wipe data/Factory reset, then select Yes on the next screen to confirm factory reset (screenshot).
- Select Wipe Cache Partition, then select Yes on the next screen to confirm wiping cache.
- Install the ROM’s zip file:
- Select Install zip » Choose zip from sdcard (or external sdcard, you know where your files are) » browse to the location where you saved the file and select the lol-rom-beta-0.7.zip file.
- Select Install zip » Choose zip from sdcard (or external sdcard, you know where your files are) » browse to the location where you saved the file and select the lol-rom-beta-0.7.zip file.
- Reboot your device. For this, go back to the main menu of recovery and select reboot system nowto boot into Lots Of L ROM.
GUIDE FOR TWRP RECOVERY USERS
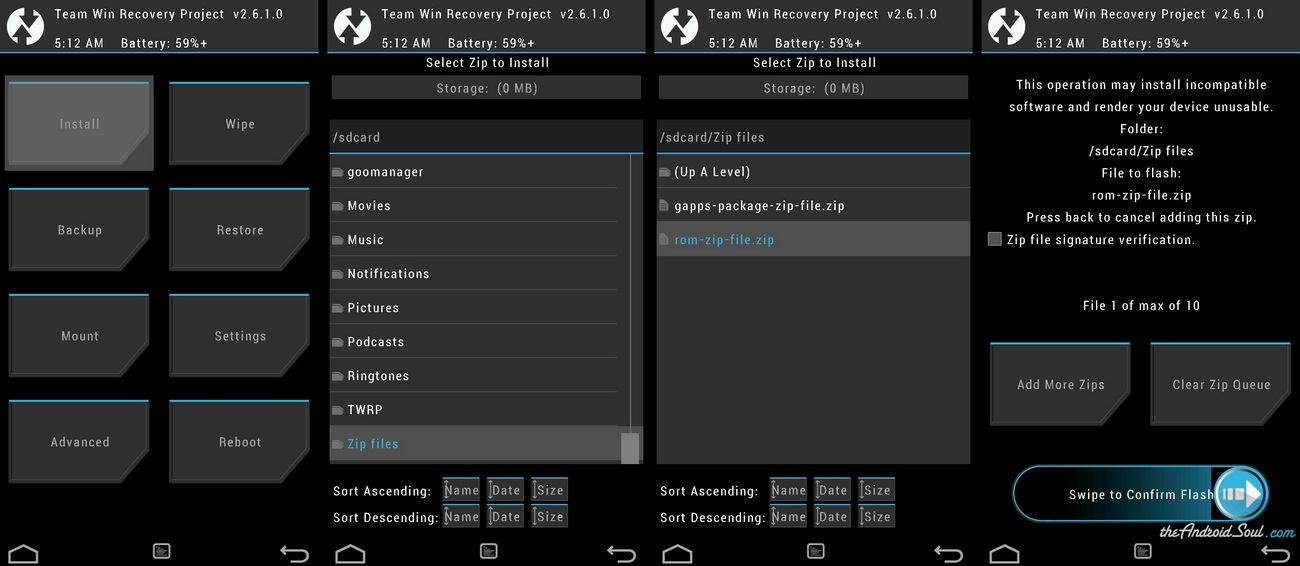
- Boot into recovery mode. If you’re rooted, the easiest way to boot into recovery mode would be using the QuickBoot app. If not rooted, then search for the hardware keys combo for entering to the recovery on your device.
- Create a Nandroid Backup from recovery. It’s optional but very important to do, so that in case something goes wrong you can restore to current status easily. For making a Nandroid Backup, go to Backup » and select all check boxes and swipe on the Swipe to confirm option at the bottom of the screen to confirm backup.
- Perform a Factory Reset (this will delete all apps and their settings and game progress). For this:
- Select Wipe » then at the bottom of the screen do a Swipe on the ‘Swipe to factory reset‘ option (screenshot).
- Install the ROM’s zip file:
- Tap on Install » browse to the location where you saved the file and select the lol-rom-beta-0.7.zip file. Now at the bottom of the screen, do a swipe on the Swipe to confirm flash option to begin flashing.
- Tap on Install » browse to the location where you saved the file and select the lol-rom-beta-0.7.zip file. Now at the bottom of the screen, do a swipe on the Swipe to confirm flash option to begin flashing.
- Reboot your device. Go back to the main menu of recovery and tap on Reboot » then, tap on System to boot into Lots Of L ROM.
It was easy to install ‘Lots Of L’ ROM , right? Let us know how it is to your liking in comments below.
That’s it. Let us know via comments below, what you think of the ROM. Happy flashing!
Bugs Tracker
This list will be updated to keep a report of issues taken note of, and their fix status. Please tell us whatever inconsistency you notice with the ROM with screenshots using the comments below, and we will be sure to list them up here.
Bugs List:
- (Fixed) Same color text and background in some pop-ups. (Though, Unknown sources pop-up still has it but it’s already removed and will not be there in beta-0.8. You know that pop-up anyway very well, no? So, no issues.)
- (Fixed) WiFi: One just needs a Samsung firmware I9505VJUGNE2 as base. If you still have WiFi problem, install Googy kernel fro I9505.
- You tell me ;)
Changelog
Version 0.7:
- All pop-ups bugs fixed
- Updated all apps to their latest version. Some Google Apps would be done in version 0.8 (already done on my PC)
What’s Next
For version 0.8:
- Translucent status bar
- Latest Google keyboard and Google Now Launcher with Google Search
- Latest Google Apps


